Transformation Builder

Cloudinary
UX
UI
SaaS
B2D
Introduction
The Overview
As a Product Designer in Cloudinary, I was lucky to led the design part of the New Transformation Builder project. This tool was supposed to expose to new and existing Cloudinary developer users media editing transformations* - which are a part of the core product features.

Cloudinary is a developer-oriented company that offers an API-driven cloud-based media management platform for storing, optimizing, and delivering images and videos across various devices and platforms.
The Goal
Replace the outdated Transformation Builder with a new tool that will improve the user experience and increase the usage of media editing transformations*.
*Media editing transformations - API-driven image and video manipulations that enable actions like cropping, resizing, and adding watermarks at scale.
My Role
1
Led the Design Part of the New Transformation Builder Project
I took full ownership of the design aspect of the project, leading the efforts to improve the user experience and create a more intuitive and user-friendly tool for Cloudinary's Transformation Builder.
2
Conducted Research and Discovery
I conducted stakeholder interviews, competitive analysis, and user research to gather insights and understand user needs.
3
Collaboration with Stakeholders, Product Management, and R&D Team
I worked closely with stakeholders, including the company founder, head of product, product managers, and development teams to align on goals, gather feedback, and ensure a collaborative approach. I participated in meetings, design reviews, and usability testing sessions, fostering a strong collaboration between design, product, and development.
Problem Statement
Old version of the Transformation Builder
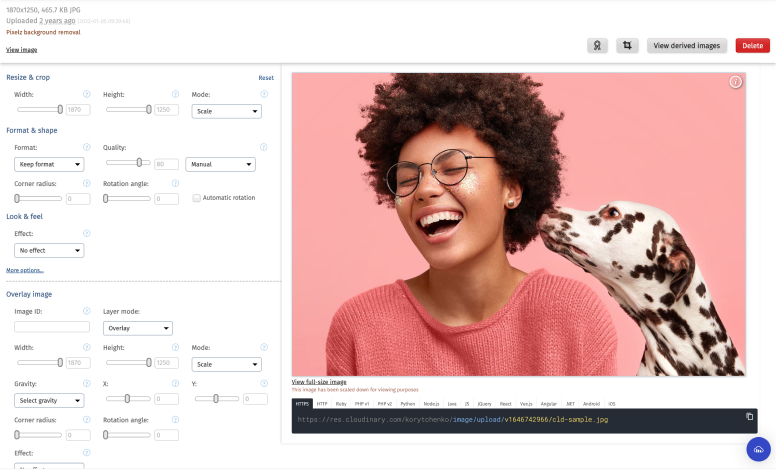
Transformation Builder: Old Version
The Problem
With time the old Transformation Builder gained too many limitations and issues:
1
Low Adoption of the Media Editing Transformations
From the API usage data we saw that 82% of the Cloudinary users use optimization and delivery transformations, and a very low usage of the media editing transformations (which are more expensive)
2
Bad User Experience
We consistently received complaints from users in our console feedback form
3
Legacy Code
Cloudinary consistently updates and adds new capabilities that were hard to maintain in the old Transformation Editor
4
Missing Analytics Events
The absence of Google Analytics blocked us from understanding the current usage of this tool
5
Misalignment with a Company Mission
Cloudinary originally was built by developers for developers. The company with cutting-edge technologies, but it’s impossible to be seen like this with the old Transformation Builder which had clumsy and outdated UI
The reason that the old Transformation Builder hadn’t been updated for years is that Cloudinary users are developers and they use Cloudinary APIs in their IDEs. So, the redesign task of the old Transformation Builder always had low priority. But with this set of issues - the key members (company founder, head of product, product management directors) were convinced and gave a green light for the redesign project.
The Opportunity
With the new Transformation Builder, we wanted to achieve the following:
1
Increase Media Transformations Adoption
Better onboarding for new users: we wanted to expose to new users that Cloudinary has different use cases including the media transformations for image and video and optimization and delivery
Exposure for existing customers: promote media transformations for existing users with Transformations Gallery
2
Improve User Experience
To allow users to understand the transformation concept and how it can be used at scale programmatically
3
Move to React
Use React as the rest of the console and not Ruby. Build in a future-proof way, to allow the ability to maintain and add new capabilities easily
4
Add Analytics Events
Define analytics events to be able to monitor the tool usage
5
Align with a Brand
Developers must feel at home when they use the tool
Research & Discovery
As a part of the Research and Discovery stage, I’ve used the following methodologies:
Stakeholder Interviews
I scheduled a few interview sessions with team members (company Founder, Head of Product, Product Managers responsible for developer products, CS, Front-End and Back-End Developers). Based on the results of the interviews the persona was built.
Persona
Lilli, Front-End Developer
The Background
Lilli is an experienced Front-End Developer with a strong proficiency in web development technologies. She has been using Cloudinary for optimization and delivery of images in her previous projects.
The Goal
Improve Media Handling: Lilli's current project requires her to handle a large number of images with various sizes, and she wants to learn how to leverage Cloudinary's media editing transformations to efficiently resize, crop, and optimize the images programmatically.
The Pains
Time Constraints: As a Front-End Developer, Lilli understands the value of efficiency and does not like to waste time on long processes. If the learning curve for Cloudinary's media editing transformations is not user-friendly, it may cause frustration and impact her productivity.
Complex Transformations: Lilli may find it challenging to handle complex media editing transformations, especially when dealing with large batches of images.
Motivations
Lilli is motivated to explore and master Cloudinary's media editing transformations because she believes it can significantly enhance her ability to manage and manipulate media assets efficiently. Learning and implementing these capabilities successfully will not only improve her current project's performance but also enhance her skills as a Front-End Developer.
Competitive Analysis
1
Cloudinary Competitors
I checked the main Cloudinary competitors (IMIGX, ImageKit.io, Sirv) and I didn’t find anything similar to the Transformation Builder. So, it seems that we have a great opportunity to improve something our competitors don’t have.
2
Developer Tools
The Transformation Builder is a part of the Programmable Media product. The users of these products are Developers of all types: Frond-End, Back-End, and Mobile.So, the New Transformation Builder must give Developers the feeling that it was created for them: starting from the Dark Mode (that Developers love so much) to how the code snippet looks and what is the frameworks' order. I’ve checked tools like CodeSandbox, GitHub, and Sublime Text
3
WYSIWYG Editors
The purpose of the Transformation Builder is to help new users to discover our capabilities and create complex transformations for existing users. After the transformation is saved - users can use it at scale (deliver hundreds, thousands, or even millions of image or video files). So, I checked a popular WYSIWYG editors. I wanted to see the patterns and standards of UX and UI for layouts where users build something and see the results on the same place. I’ve checked Adobe Dreamweaver, Webflow, and Squarespace
4
Media/Graphic Editors
Also, as Transformation Builder is a sort of media editor, I checked some graphic editors such as Adobe Photoshop, Google Photos, and MacOS Photo Editor.
Data Analysis
Programmable Media has a huge amount of capabilities. Product Manager and I revewed the available data from SDK analytics and found the top-used capabilities.
This data helped us to understand the current usage and decide what capabilities are crucial and must be included in MVP. Other capabilities went to prioritized backlog.
Design Process
I approached the project using the Design Thinking methodology. Since we work in an Agile environment, I needed to ensure that our R&D team was not left without work. I obtained a list of priorities from the Product Manager, allowing me to parallel follow the Design Thinking steps while closely collaborating with the R&D team in daily planning meetings. This approach helped me stay up to date on the project status, conduct design reviews on the fly, and be available for any design-related questions.
The process of the MVP stage was different than the process of Post-Release, so I decided to describe to you the process of both stages below.
MVP Phase
MVP Phase Design Process
Emphasize & Define
As described previously, I conducted stakeholder interviews and competitive analysis. So, it was clear to me who is the user and what problem I need to solve.
Ideate
During the MVP phase, we consistently had brainstorming sessions with project stakeholders where I presented the low-fidelity wireframes and received feedback. R&D members also joined these sessions - it was important to get feedback from developers as we design a tool for developer needs.
Once, the concept was approved - I moved to the next stage.
Prototype & Test
At this stage, I created low-fi wireframes of the basic user flows that were presented as a part of usability testing sessions to project stakeholders (including CS and Developers). I wanted to validate if the layout is clear and if users understand how to add/delete actions and layers.
Once, the flows were validated, I started designing the high-fidelity mockups. It was important to use our Design System and have a good understanding of when I can use the existing components and when I must create a new one - as adding a new component to the Design System it’s time-consuming for both sides of Design and Development.
Implement
It was important to have grooming sessions with the R&D team to present the final screens before the sprint starts. It was a great experience to share something that we designed for Developers with our Developers to get feedback. I joined all R&D-related meetings and I found a big value in the collaborative work of Product, Design, and R&D. We work on a tight timeline, so, these meetings where all relevant people took part allowed us to raise and answer important questions and solve issues as fast as we could.
Post Release Phase
Post Release Design Process
Test on Production
Screenshot from the usability sessionScreenshot from the usability session
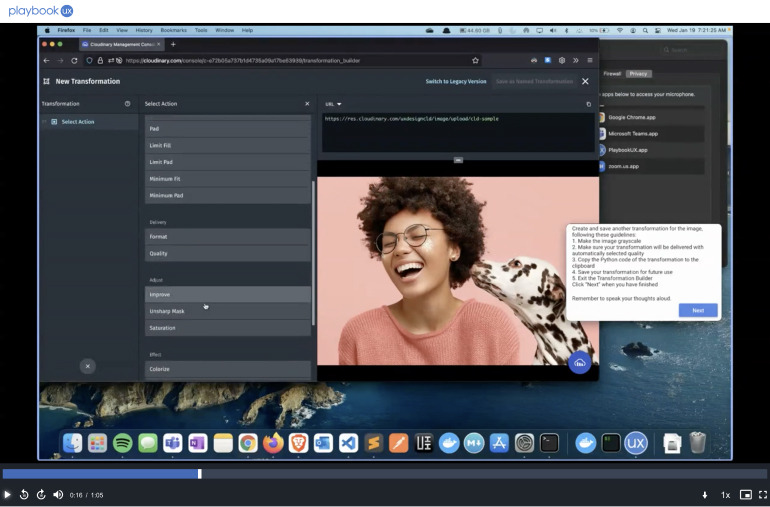
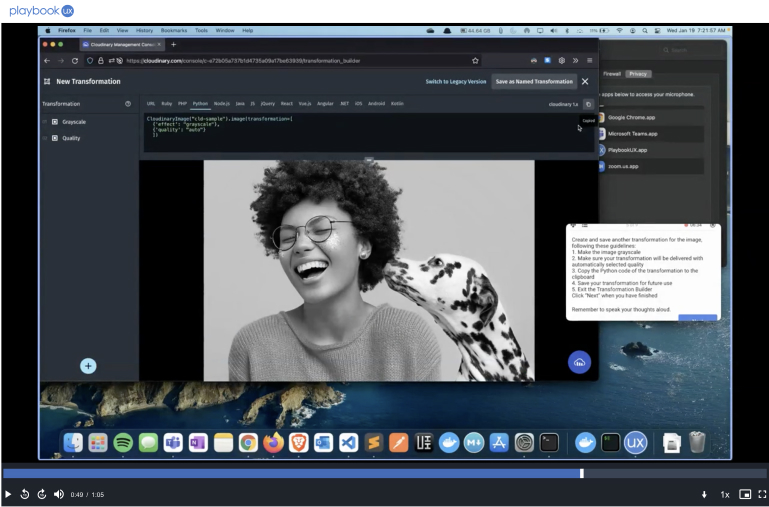
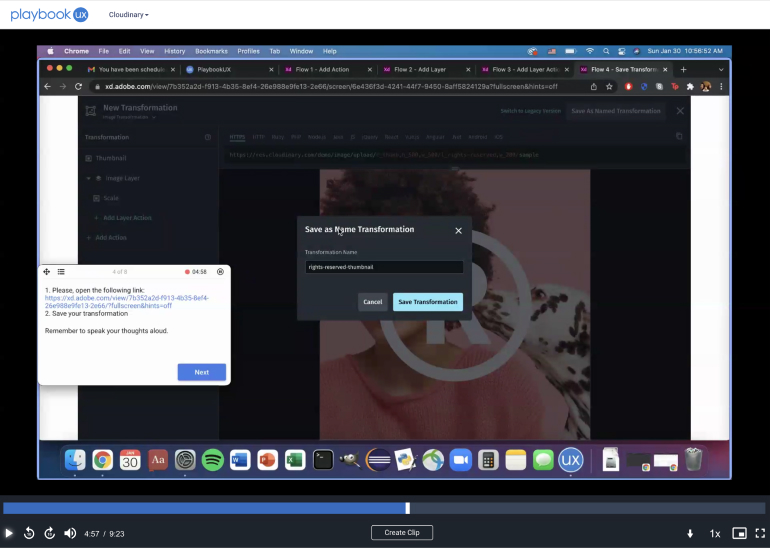
Screenshots from the usability sessions on Production
After the New Transformation Builder was released, I conducted usability testing sessions on the Production Environment. I used the PlaybookUX platform where I can get feedback from people, who don’t use Cloudinary and are not aware of the transformation concept. These sessions were super-valuable. It was great to see when people were completing the task without any problems and when someone was struggling - I understood what is the problem and how can I solve it.
Also, I showed some usability session clips to the R&D team. They were very excited to see the real person uses the tool they built. After they watched the videos, they also saw some issues with the product, so now, it was very clear to understand our next tasks for improvement.
Emphasize & Define
After summarizing the usability session recordings - I got a list of suggestions for improvements that I presented to the Product Manager. We reviewed the list, set up the priorities and I was ready to go to proceed to the next stage.
Prototype & Test
Screenshot from the usability sessionScreenshot from the usability session
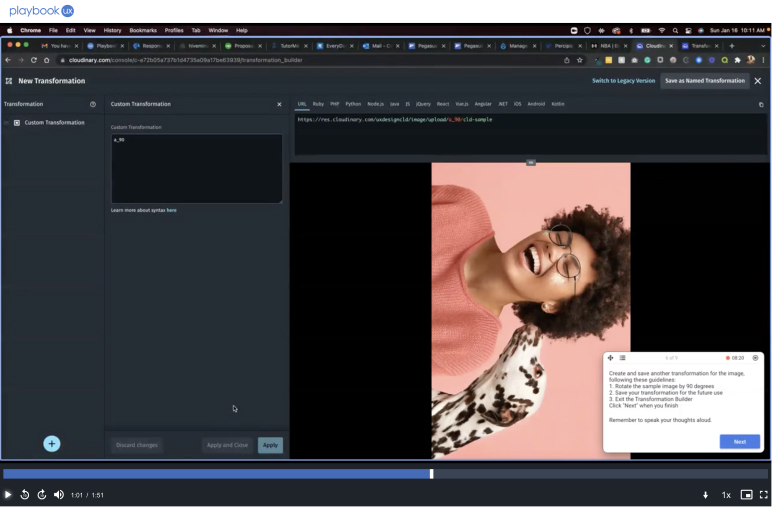
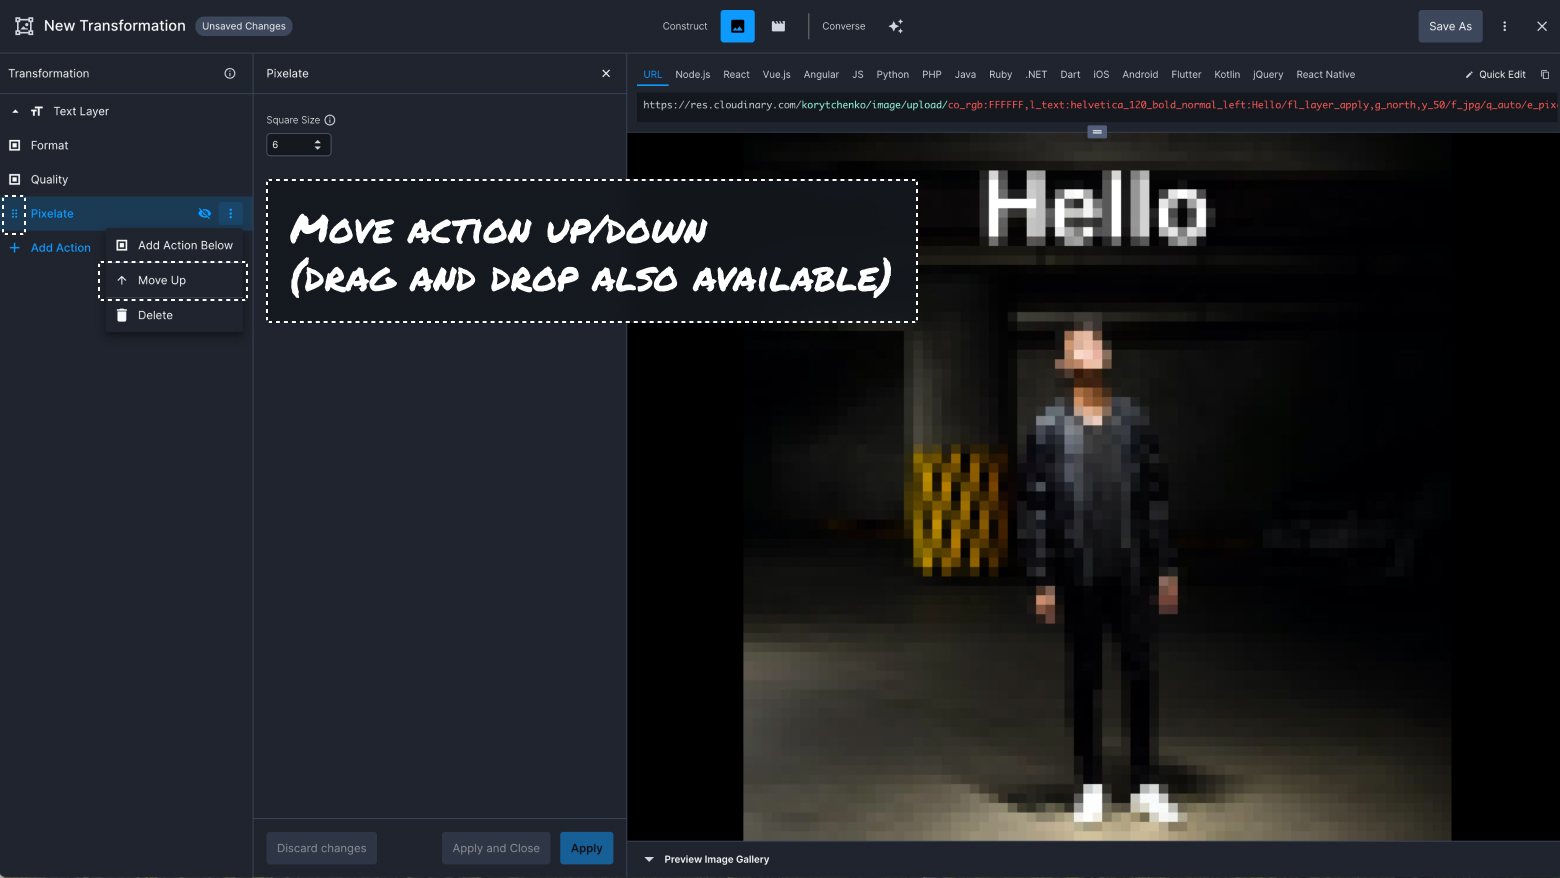
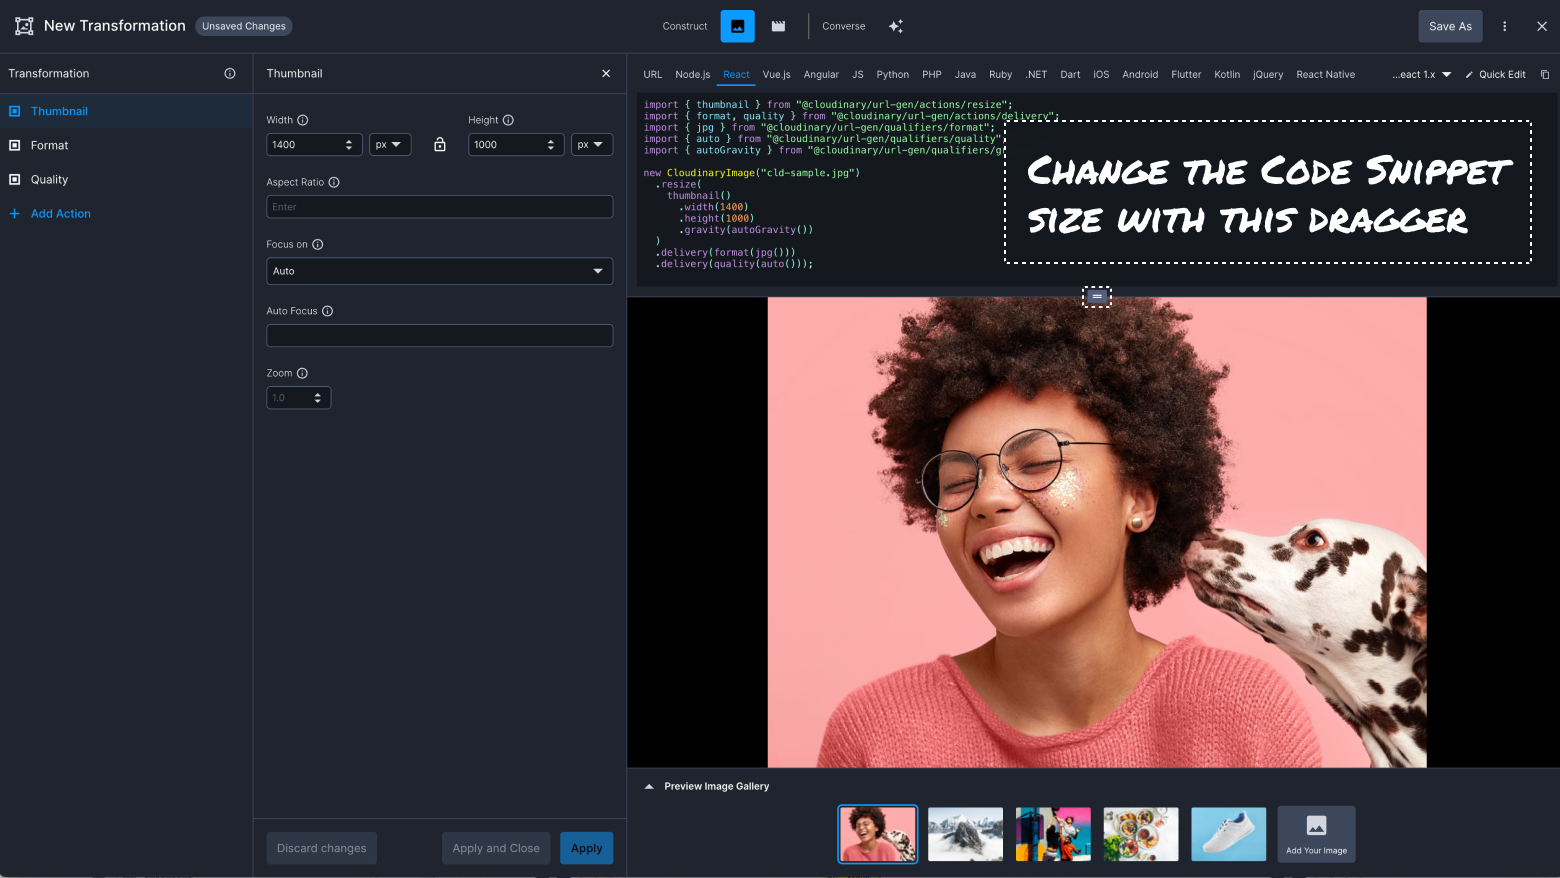
Screenshots from the usability sessions using interactive prototypes
As I already had a high fidelity designs for the Transformation Builder and clearly understood the problems we are trying to solve - I created mockups for the improvements fast and validated them again with PlaybookUX users. After one iteration we were good to go to proceed to the implementation stage.
Implement
I presented the mockups of improvements to R&D and I was glad to see they totally understood these decisions. Also, these improvements were considered quick wins, as the hardest work was done already. So, the improvements were implemented in a few sprints and released to Production after QA.
Customer Insights
I initiated monthly CS x Design meetings with the CS team member. The purpose of these meetings was to review design-related customer tickets and add relevant tickets to the design backlog. At one of these meetings, I got a few suggestions for improvements from our Strategic Customer for the New Transformation Builder. I took it with the Product Manager and we proceeded with these improvements pretty fast. Once the improvements were released, the customer was updated about these changes.
Once, I was invited by CSM to join a call with a customer to discuss some transformation issues. On this call, I was surprised to see that CSM shows how to solve the problem in the old version of the Builder. So, I asked what is the reason of using the old version. The answer was that he was missing some capability. It was an important thing that we missed, so we fixed it quickly.
Design Solutions
The Latest Version of the Transformation Builder
Dark Theme Icon
Dark Theme
The tool was designed using a dark theme, something that developers love. Also, it’s a common pattern to use a dark interface for image and video editors
Layout
The Layout
Header with transformation name, transformation type switcher, and save buttons
Actions panel where the user builds the transformation
Code snippet - where the users can see how the transformation works in code. Also, users can actually use this code on their website or app
Preview area - where the users can validate the result
Preview image gallery - where users can see how transformation works on different types of images and refine it if needed. Also, the users can pick another image
Examples of Changes Based on User’s Feedback
1
Actions vs. Code
Actions vs. Code
In the beginning, we considered a separate view for the actions panel and the code. Meaning, the code won’t be seen as a default. After getting the feedback from stakeholders, we understood that code should always appear in the tool for Developers. So, I created a layout where the code and actions panel are always visible.
2
Empty State
Empty State
We started with the message “Start creating your transformation” and three action buttons - “Add Action”, “Add Image Overlay”, and “Add Text”. It happened because we felt we must follow the API structure (API counts actions and layers as separate things). After, a number of iterations we came to the decision to show a flattened list with all available actions and layers). We removed the extra click and got users straight to the action.
3
Actions Filter
Actions Filter
After we updated the empty state to the flat actions list. We got a suggestion about adding the filter, as our actions list is quite long. So, we added an actions filter. Also, to get the empty state more user-friendly, the filter field is selected by default. So, the user can start writing and filtering the actions after the tool was opened. It was great to see in other tests how users start typing something to filter the list in other tests.
4
Layers
Layers Panel
In our API there is no such thing as a layer, we have image overlay and underlay, and the same goes for text. During the usability test, when users got a task to add a watermark - they struggled to find this overlay action. Users who found this action called it “layer”, then, we decided to rename these actions in the Transformation Builder to “Image Layer” and “Text Layer”. I validated the result as a part of another usability session and got good results.
5
Additional Transformations
As I mentioned earlier, we used the SDK data to understand the most popular and relevant actions used to define the action list in the Transformation Builder. However, we wanted to provide users with the ability to use more advanced features and actions that are not included in the list. To address this, we introduced the "Additional Transformations" action, which includes a text area where users can input anything they need using our syntax. We also provided a link to the documentation.
During the usability testing session, only two out of five users were successful with the task. As a result, we decided to update the placeholder text in the text area and provide a real example of what can be written there. Additionally, we included three additional examples with explanations that users can easily copy by clicking on them. We also included a link to the documentation as the last item. In a subsequent usability testing session, these updates significantly improved the user experience.
6
Preview Image Library
Preview Image Gallery
For new users, it’s very easy to think of an image editor when they see the Transformation Builder for the first time. So, we wanted to emphasize that transformation works on any amount of images. Below the preview area, we put “Preview Image Gallery” where we put five images of different types. So, the user can easily switch between the samples and see how the transformation works on the selected image. Also, we added an option for the user to select a different picture as well.
7
Show/Hide Actions
Show/Hide Actions
This came from our Strategic customer who used the New Transformation Builder. The customer said that it could be a huge improvement if we add an ability to show and hide actions. It could be useful when you work on complex transformations and you like to check something by hiding one or more actions. In the previous implementation, the user can do this only by deleting the action. So, the suggestion was accepted, designed, and validated with a usability session fast. Implementation took one sprint only which is considered as a quick win.
8
Move Actions Up and Down
Another suggestion that came from the same Strategic customer is to add an ability to move actions up and down. The order in transformation is crucial, in the case of complex transformation that has many actions. In the previous implementation, it was possible to add an action below another action, but once it was added user didn’t have a way to move it up or down in the case of error or validation purposes. The action deletion was the only way to put the action in another place. So, we decided to add an ability to move actions up and down by adding a common drag-and-drop design pattern. In addition, we added also buttons allowing us to do the same. The design and validation with the usability session went smoothly. Also, it turned out, that this task was very cheap for R&D to implement, so, it was implemented also in one sprint and was also considered as a quick win.
9
Apply and Close
Apply and Close
A minor change but pretty valuable. In the beginning, we had only the “Apply” button on the Action Details panel. Meaning, the user must close this panel either by clicking “X” on the top of the panel (a different place than the “Apply” button) or click on “Add New” on the Action Panel. Very soon we realized, it will be a great addition to add an “Apply and Close” button. So, when the user is working on an action, changes values, and wants to see the result, he or she will use the “Apply” button. Once the user is done working on the action - clicking on “Apply and Close” will apply the latest change and will close the panel. It was great to see in other tests how users use “Apply and Close” without thinking.
10
Code Snippet Resize
Code Snippet Resize
Another small but useful change. Sometimes, the transformation code could be long and cause both horizontal and vertical scroll. We got complaints about the scrolling issue and decided to add a dragger that allows users to resize the code snippet height as needed.
Impact & Results
Impact
Cloudinary users got a new tool where they can learn and work with media editing transformations.
The user experience was improved drastically based on iterations and a bunch of usability sessions were done.
The Transformation Builder was developed in React, this will allow us to maintain the tool consistently by improving it and adding new features. Also, it allows easy customization, so it was already used in another Cloudinary product for non-developers and it’s using a light theme and doesn’t have a code snippet component.
The Google Analytics events were provided by the Product Manager and successfully implemented by the R&D team. So, now we have the data that allows us to monitor the usage of the tool.
All new Cloudinary employees have a session where they learn about transformations including playing with the Transformation Builder to create an employee profile picture that will appear on the Cloudinary website. Also, this session is great for collecting feedback from people who are not aware of the transformation concept.
The Transformation Builder was presented by Product Manager and me in a Town Hall session, a company meeting where all the employees can participate and present something they worked on.
We’ve implemented the Transformation Builder in the public Documentation site, this allows users to play with the editor before they sign up to Cloudinary.
Results
Right to date, we have 230,035 users who have the tool and only 8,417 engaged accounts, meaning only 3.66% of engagement
Engagement
Engaged Accounts
8,417 of 230,035
Engament
3.66%
Right to date, we see that our optimization and delivery actions are still on the top of the use:
Optimization & Delivery
Format
1.3 Trillion
80% of total requests
Quality
1.2 Trillion
74% of total requests
VS.
Media Editing
Effect
160 Billion
9% of total requests
Layer
11 Billion
0.7% of total requests
So, from the results perspective, we didn’t achieve the business goal of adoption of the media editing transformations. But we learned from it and now we are working on the solution. What is the reason for that? I have assumptions and I will touch that in the next section.
Key Learnings
1
Focus on Full User Journey
We focused on redesigning the Transformation, but we missed the bigger picture. If I start this project now, I would focus on the user journey from the discovery stage (including the Cloudinary website and Documentation) to becoming a user who understands and likes the product.
2
Show the Value
Prepare a library of transformations based on real-life use cases. This page must show users the value of media editing transformations. Then there is a bigger chance that users will sign up for Cloudinary and will start using the product including the media editing transformations.
3
Work with Product Marketing on Launch Activities
We didn’t have the official launch of the New Transformation Builder. If I start the project now, I would be sure to include the Product Marketing to build the campaign around the launch, considering having a landing page, and a blog post that will be shared across social networks.
4
Good Collaboration Makes a Work More Productive
Collaboration between stakeholders, product, and R&D was super-important. Everyone was aligned with the decisions, synced with the project status, knew what is the roadmap, and was available for any project-related questions.
5
Share Feedback with R&D, Project Owners, and Peers
I found it very valuable to show usability testings recording of real users using the tool they developed. It make R&D team members feel more engaged with the project and understood our decisions for future tasks. Also, I presented these clips to Product Team as a part of the project summary presentation, which emphasized the need and value of usability tests to Product Team members.
Conclusion
/
TL;DR
The New Transformation Builder project aimed to address the limitations and issues of the outdated Transformation Builder tool in Cloudinary. Through extensive research, ideation, prototyping, testing, and implementation, we were able to design and develop a new tool that significantly improved the user experience and aligned with Cloudinary's brand as a developer-oriented company.
The Project Successfully Achieved the Following Outcomes
1
Improved User Experience
The user experience of the Transformation Builder was greatly enhanced through iterative design and usability testing. Feedback from stakeholders and users was carefully considered, resulting in changes such as the visibility of code snippets, improvements to the empty state and actions filter, and the addition of features like show/hide actions and move actions up and down. These enhancements have made the tool more intuitive and user-friendly.
2
Future-Proof Development
The decision to develop the New Transformation Builder using React, rather than Ruby, has positioned the tool for easy maintenance and scalability. React's flexibility allows for the addition of new capabilities and customization. This future-proof approach has already been leveraged in another Cloudinary product for non-developers.
3
Analytics & Data
The implementation of Google Analytics events has provided valuable data for monitoring the usage of the Transformation Builder. This data allows insights into user behavior and usage patterns, facilitating data-driven decisions for future improvements and optimizations.
4
Collaboration & Engagement
Close collaboration between stakeholders, product management, design, and R&D teams proved instrumental in the success of the project. Regular communication, feedback sharing, and alignment ensured that everyone understood the project's goals, roadmap, and progress. Usability testing recordings were particularly effective in engaging the R&D team and demonstrating the real-world impact of their work.
Key Learnings from the Project
1
Focus on the User Journey
Consider the entire user journey, from discovery to becoming a user who understands and appreciates the product. This includes enhancing the Cloudinary website, and documentation, and providing a library of transformations based on real-life use cases to demonstrate the value of media editing transformations.
2
Launch & Marketing
Plan for an official launch of the New Transformation Builder, incorporating the Product Marketing team that can help with building a campaign, creating a landing page, and posting a blog post to generate awareness and engagement. Leverage social networks and other channels to reach the target audience.
3
Analytics & Data
The implementation of Google Analytics events has provided valuable data for monitoring the usage of the Transformation Builder. This data allows insights into user behavior and usage patterns, facilitating data-driven decisions for future improvements and optimizations.
4
Ongoing Feedback & Iteration
Continuously gather feedback from users, stakeholders, and the customer support team to identify areas for improvement. Iterate on the design and implementation to address user needs and pain points.
Final Words
Townhall Session
Me presenting the Transformation Builder on the Town Hall Session
(COVID Times)
It was an excellent opportunity for me to lead the design of New Transformation Builder which is one of Cloudinary’s core features.
The project has been a significant milestone in improving the Cloudinary user experience and providing developers with a powerful tool for handling media editing transformations. With the lessons learned and ongoing dedication to user-centric design, Cloudinary is well-positioned to further enhance the adoption and usage of media editing transformations, empowering developers to optimize, deliver, and edit media assets at scale.